Here are some pictures of a rotator cuff tear, before and after repair. They are mixed with some diagrams to help you understand the process of rotator cuff repair.
 |
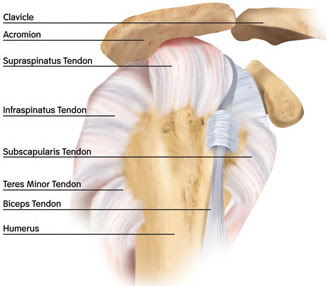
| Normal shoulder viewed from the side. |
 |
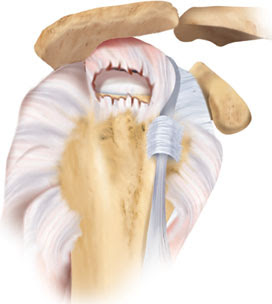
| Above is a diagram of a rotator cuff tear similar to the one seen below. |
 |
| This is a medium sized rotator cuff tear. The torn tendon (top) has been ripped for the bone (bottom). |
 |
| An arthroscopic instrument grabs the tendon to check for tendon mobility and excursion. |
|
| A plastic anchor is placed in the bone. This serves as an attachment point for the sutures which will be passed through the torn rotator cuff tendon. |
|
| Sutures have bee passed through the tendon on the left and a second anchor will be placed just to the right of the tendon to complete the repair. |
|
| Here you can see the repair in progress. There is a plastic anchor in the bone. Those purple sutures on the right side are attached to the anchor and have been passed through the tendon. |
|
| Second anchor being placed. |
|
| The repair is completed above. |
|
| You can see the repaired tendon. The gap that could be seen in the first picture is now closed as the sutures pull the tendon to the surface of the bone. Over 6 weeks this should heal allowing normal shoulder function in most cases. |
|
| Another picture of the same repaired tendon. These sutures are attached to anchors that are buried in the bone. There is an anchor buried under the tendon on the left of the picture which you cannot see here. Those sutures are pulled over the edge of the tendon and attached to 2 other anchors completing the repair. |
|
| Another view of the repaired tendon. |
|
|
Below are some pictures from another rotator cuff repair.
|
| Another tear. View from inside the joint. Tear is to the right. Humeral head on the bottom, biceps to the left. |
|
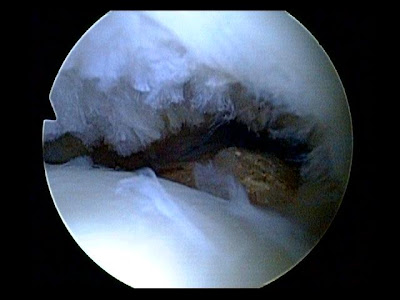
| Another view of the tear. Notice the shredded fibers of the tendon. |
|
| Here the biceps tendon is inspected. It appears slightly inflamed but not torn. An inflamed biceps tendon can cause pain. The biceps is right behind the metal probe in this picture. |
|
| Above a needle is placed through the tear as we are in the process of repair. |
|
| Above we see a metal instrument placed through the tear showing the full extend of the tear as it is lifted away from the bone. This is a medium sized tear of the supraspinatus tendon. |
|
| Another view of the tear as we proceed with repair. This view is from inside of the joint on the lower surface of the tendon. |
|
| Here the camera is looking at the top surface of the tendon. Notice the fraying of the tendon that results from friction between the tendon itself and the bone spur above. That metal instrument is touching the bone spur as I am in the process of removing it. |
|
| A view of the tear from the top surface of the tendon. Notice the frayed edges of the tendon. The tendon has ripped away from the bone seen on the bottom of the photo. |
|
| Just another view of the tear. |
|
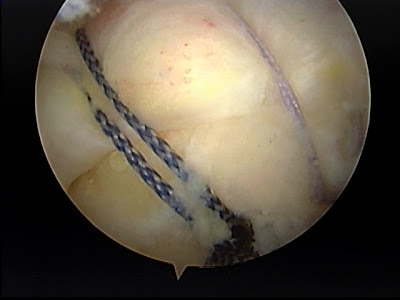
| Repair in progress. Notice the anchor and sutures on the left. These are passed through the tendon, tied medially and then attached to a second anchor laterally. This accomplishes and “double row” or “suture bridge” repair. Two medial anchors and two lateral anchors were used in this repair. |
|
| Repair completed. |
|
| Great repair. This repair is water tight as the tendon is compressed to the bone. The space between the blue sutures is just a few millimeters and will heal well in time. It takes 6 weeks for the tendon to heal to the bone. If the patient uses the arm normally before it heals, or if strengthening exercises are started before the tendon is ready, it will pull away from the bone resulting in a failure if the repair. Listen to your doctor and therapist for guidance regarding your post operative protocol. |
I did not draw the above diagrams but I did fix these tendons.
Thanks,
JTM, MD


